|
You will find below some of the free Tutorials that we have found on the Internet for our use.
Try these Aperture Settings

- Portraits - [F2] Keep the focus on your subject using a wide aperture and get an artistic depth of field effect.
- Landscapes - [F10] This will give you a sharp landscape shot that will be well focused.
- Wildlife and Pets [F2.5]]
A faster shutter speed increase will ensured a sharp shot and will get an out-of-focus background.
- Macro [F3.5] Will softly blur your background making your macro subject the focus.
- Still Life [F2.4] Using a wide aperture will give you a great artistic still-life shot.
- Sport [F3.5] A smaller f-number and a longer shutter speed are required for panning sports shots.
ISO Settings in Digital Photography
 View View
In Digital Photography ISO measures the sensitivity of the image sensor. The same principles apply as in film photography, the lower the number the less sensitive your camera is to light and the finer the grain.
Higher ISO settings are generally used in darker situations to get faster shutter speeds..
Introduction to Aperture in Digital Photography
 View View
If you can master aperture you put into your grasp real creative control over your camera. In my opinion, aperture is where a lot of the magic happens in photography and as we will see below, changes in it can mean the difference between one dimensional and multi dimensional shots..
An Introduction to Mastering Slow Shutter Speeds
 View View
For many photographers, darkness is their worst enemy. After getting a basic understanding of how cameras work, the next things photographers must understand is how to operate in low light. Most new cameras have advanced dedicated flashes (sometime built into them), which can make dark situations easier to shoot in. But almost all modern cameras also have slow shutter speed settings that extend to eight seconds or beyond..
Common mistakes at every shutter speed (and the best settings you should use)
 View View
At a basic level, shutter speed is used to control exposure, but it can also be used as a creative tool that freezes action or adds dramatic blur to moving subjects. However, whenever we venture outside our comfort zone, this is where we encounter problems..
Digital Photography Tips and Tutorials for Beginners
 View View
A large proportion of Digital Photographers classify themselves as beginners, so we thought it might be helpful to have a page set up that collates some of our Digital Photography Tips for Beginners.Here is just a selection of some of our digital photography tips and tutorials aimed more at the beginner photographer..
25 Landscape Photography Tutorials
 View View
One of the most popular topics is that of Landscape Photography. There have been hundreds of articles on the topic over the years but to help you find them we have pulled together 25 of the most popular Landscape Photography tips and tutorials and listed them.
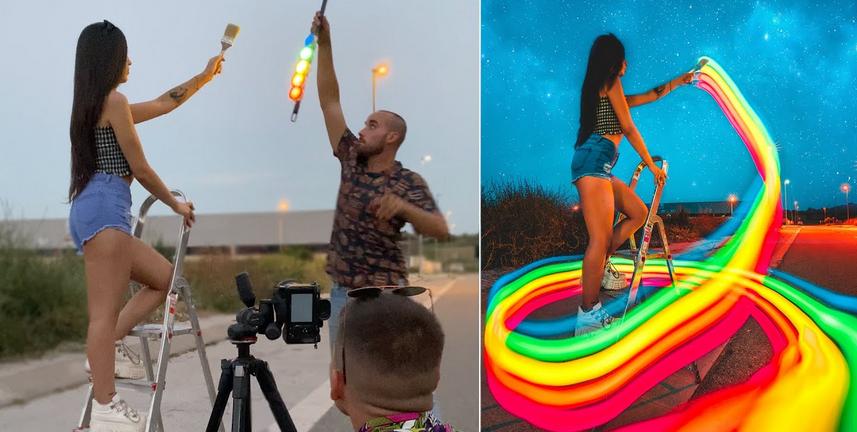
Light painting

This is a fun photography technique where photographers use camera flashes, flashlights, and spotlights to paint light in a scene. It can easily qualify as the best/most fun night photography technique. Although many photographers have attempted it before, only a few have mastered the technique. Below are some very useful tips to consider when you want to perfect your light painting skills.
1. Try out different light sources
This is very important You shouldn't’t try painting everything using the same light. To avoid odd and flat pictures, consider using different light sources, otherwise your work will defy the sole purpose of light painting, which is to create unique light impressions on different landscape parts at night.
2. Use dimmable light sources
For the best results, you need to choose dimmable light sources, because light painting relies heavily on light intensity. To get the best results, you must be able to alter light intensity whichever way you like to ensure every part of a photo gets the right amount of light.
3. Take care of the noise
It is important to note that long exposures create more noise. Because of this, take time painting in light, but don’t forget to factor in this small detail; it can be the difference between good and bad lighting photography.
4. Take multiple shots
To get the best light painting photos, you need to take as many shots as possible. Multiple shots help you treat different parts of a photo separately which should be the case in light painting.
5. Use flashlights that don’t have hot spots
Moving your flashlight beam randomly when taking light photos doesn’t make a big difference even if your flashlight has a hot spot (a bright circle located at the center of the beam). The hotspot does, however, make a big difference when you are considering fine details in scenes. If you don’t have money to buy the perfect flashlight, consider taping tissue paper or wax paper over your flashlight lens to eliminate hot spots.
6. Include night photography techniques
Just because you are light painting shouldn’t mean you forget typical night photography techniques. You must consider techniques like mirror lockup, cable release, long exposure noise reduction, etc., to ensure you get the best outcome.
7. Mix ambient light
You should also remember to incorporate ambient light—like street lights or moon light—to add mood to your photos. Using flashlights shouldn’t mean you ignore all other light sources.
Keep these tips in mind next time you head out for a light painting shoot.
About the Author:
Swee Shiong Chong writes for SG East Photo
|
|

 View
View  View
View  View
View  View
View  View
View  View
View